The Vault Regulars

Saturday, August 31, 2013

Stove test - amendment

I have taken a couple of photo’s of the Flat Cat type stove i made in the last post so that you can see the flame pattern.

 Even though the stove is basically an open well type stove you can see that the holes act like jets.
And then when a pot is put on the stove, notice that it uses the hottest part of the flame, efficiency is increased and soot reduced. (I have put a trivet on top of the stove to support the pan for these photo’s) I am currently making a windshield to suit my Evernew ca-251, 600ml pan and then the trivet will be redundant.
It boiled 400ml of tap water in 6 minutes without a shield so i am expecting a little better when the heat shield is in place. I like the fact that the flame stays just about inside the pan base resulting in very little heat loss.

Thursday, August 29, 2013

My quick stove test - for what it’s worth.

 Well i have had a good number of hits on my 12-10 type stove post. Not too many comments coming from the hits though. But one comment from fellow blogger Martin Rye got me thinking. Now Martin’s views are worthy of listening too and he recon’d that his Flat Cat stove was the best with superb efficiency.
So i thought i would make one, give it a try and see how the results turned out.
Now the genuine Flat Cat stove has 24 outlets whereas mine had only 20 so in theory my stove would not be as quick as the genuine stove but the fuel should last longer. Agree?

Anyway here’s a photo.

Quite well made even if i say so myself. 65mm diameter and 13mm tall

 So anyway without going into depth of statistics. It was nowhere near as good as my 12-10 type stove.
The fuel lasted longer than the 12-10 when i had the pan approximately 1/2” above the stove but when i had it positioned higher the fuel burnt away much faster. But even at 1/2” above the stove as recommended by Flat Cat designer it took almost 8 minutes to boil 400ml of water which was straight from the tap.
My homemade stove against my purchased 12-10 stove.

 This was just a quick test for my own purposes so i don’t expect readers to take it any more seriously than that. Maybe a deeper and wider stove would be better. I might try that next.
Just thought i would share my thoughts and see what reactions i got. Thanks.

Tuesday, August 27, 2013

Watergrove revisited

 Last week when i did my post on a walk around Watergrove tops i said i would come back and re-visit some of the places. I never expected it to be so soon though.
 Sunday was a gorgeous day and too good to do jobs around the house. Sheila said she wouldn’t mind doing the Watergrove walk that i had done during the week and posted about. I thought, Bank Holiday weekend and its now 10.00am, it’s going to be rather busy, but we will go and see.
 So it was a pleasant surprise to find the car park below the dam was only half full. A group of sponsored walkers were just about to set off which left only a few people around.
Seeing that i only did the walk during the week, i decided this time to vary it a little so that i could add a few more paths to my knowledge of the area.

 Here’s the route we took, we started at the picnic sign below the reservoir dam and walked in an anticlockwise direction. It took us 3 hours but we were in no hurry and you could do it much quicker.


 Following the dam wall round we passed the old mill reservoir on the right. A female Goldeneye duck and chick was spotted.
We left the reservoir track and headed off up the Pennine bridleway and through the Life for a Life forest. Sheila spent a few minutes reading the inscriptions on the trees. There are quite a few bench’s dedicated to peoples loved one’s and it’s a nice place to sit and watch the world go bye.
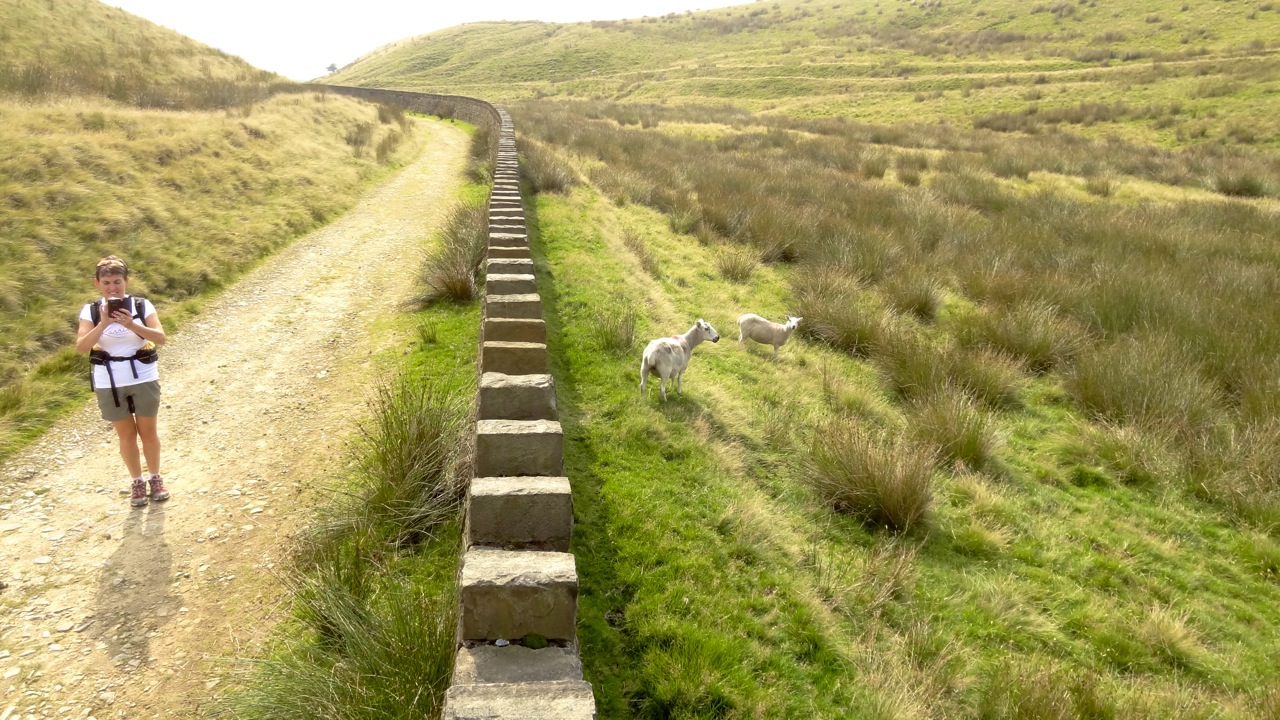
The track we were on was well made and i guess it was the original Watergrove mill workers route to and from the village of Shore.

We went through a very well built wall and i expect this is the boundary wall of United Utilities. It encircles the reservoir at around the 300m contour.
Through another gate the path heads south to Shore, passed a small unnamed reservoir. Here we left the track and followed the stream up Hills Clough. There were quite a few sheep tracks to follow which went in the right direction but no official footpath. At the top overlooking Turn Slack Dam is a well built shelter. It wasn’t marked on my OS map which i thought was a bit strange.


Shelter on Crook Hill overlooking Turn Slack Dam


 View south from the shelter
In the above photo the weather looks as though it is about to rain but it never did. In fact it got hotter reaching 23 degrees C.
There is a good path on Crook hill which heads NW towards the Long Causway. We took this and on the next hill was a drilling rig which i spotted the last time out and i thought then it might be a wind turbine being erected. Although it was off the path i had to go and get a closer look. It turned out to be a small drilling platform. Is there gold in these hills?
Gold prospecting? Ha
 I decided not to go up to Rough Hill this time but to take the path on the south side that leads to the gap between Hades Hill and Middle Hill. Old workings abound here and the shales are extremely fine in thickness and very crumbly. It must have been quite hard to dig in this area.

R-L Rough Hill, Middle Hill and Brown Wardle Hill.
 A lone walker crossed our route, only the second person we had seen. The first being a fell runner just off Crook Hill. The sun was blazing and i cursed at not fetching my Tilley Hat or sun screen, i could feel my face burning.

Path below Rough Hill
Once on Middle Hill we stopped for a brew. I had brought my home made stove with me to see how it performed in the real world rather than under ideal conditions in the kitchen.
It boiled 500ml of water in just under 8 minutes.
A welcome breeze had picked up which helped cool us down. It was precisely the right time too as it made the conditions for the stove more normal.


Brew stop on Middle Hill
It was really nice sat in the hollow on Middle Hill, a real sun trap today. We stayed for about 25 minutes before setting off for Brown Wardle Hill. Considering how close to civilisation we were at this point we still had the tops to ourselves and the views too.
As we approached the hill we had to go past a mother cow and calf and as we passed the calf let out a loud “Moo” at which point a Bull that had been lying down in the long grass got up and had a look what was going on. Sheila was away, half way up the hill before i had even got started. Fortunately it never came towards us. I think it was too hot to be bothered.
 Heading for Brown Wardle Hill
 View North from Brown Wardle Hill with Freeholds Top in distance
Pile of stones on BWH
 From the top of BWH the path heads SW but i wanted to try and find some of the old pathways which were used by people 100 yrs ago and more, before the United Utilities path was made along the side of the reservoir. So we headed SE.
An old farmstead could be seen as we dropped down with the walls of a green lane running away from the ruins. We headed for this, crossing boggy land and came across a number of obvious pathways but many were impassable. Some even had decent kissing gates which proved that even in recent times they had been used frequently but now left to the hand of nature.
 Farmstead ruins

In amongst the old buildings
 Walking the green lane
Exit of the green lane to open fell
 We found it very interesting trying to work out what walls were from what type of building, House, barn, loo etc. And to walk on the old paths quite nostalgic. Getting out of the overgrown vegetation and back onto the reservoir path was interesting to say the least. Sheila was a bit worried about ticks but we encountered none. Just stinging nettles.
I must try and find out what the farm was called. Amended 28.08.13: I think it was Roads Farm)
Along the reservoir we spotted a Great Crested Grebe.

Saturday, August 24, 2013

12-10 Stove MYOG or not.

The 12-10 stove from Trail Designs has always had a bit of a fascination on me since i saw my first one just after they came on the market. Always one to give a MYOG a try, last week i decided to give it a go. My own 12-10 stove has proved great and i much prefer it to the Whitebox type stove.
But that’s just my choice.

Conclusion.

You may wonder why i am giving you the conclusion first. Well the conclusion is very simple. Don’t bother making your own unless you have quite a bit of time on your hands.
You can buy the 12-10 stove from Ultralightoutdoorgear for £15. Here.

My 12-10 stove weighed 14 grams against the 16 grams given by Trail designs.

The 12-10 stove is worth every penny of your hard earned £15. It’s a lovely piece of well made kit and Trail Designs deserve the profit to work on the next one. Well done TD.

MYOG 12-10 similar stove.

I bought my 12-10 as i said a while ago and it’s made from 3 pieces of re- cycled aluminium.

  • A “Coke” type drinks can.
  • A “Caffeine” type energy drink can.
  • A base plate. What the original base is made from i’m not sure. Maybe it’s formed unique but made from old cans. I’m open to be educated by anyone in the know on this.
First of all, starting with the Outer skin, the coke type can.
Cutting it to length and adding the holes is a simple enough job that anyone could undertake. But the central hole is a bit harder. The drinks can starts life with the base being concave. You have to re-work it to make it convex. To do this properly you need to make a double form tool, out of wood i suggest, that will give you a nice shape. Making this former takes time and i didn’t make one.
I decided to cut the large diameter hole into the can first and then push the base out with my gloved hand. You need gloves because of the sharp edge of the hole. Unfortunately although a convex shape can be achieved it’s not as aesthetically pleasing as the bought one.
My attempt. Weight wise it is a whole gram less than the TD one. But you can see the convex shape is a bit untidy.
The inner skin, made from a caffeine type drinks can, again is easy to cut to length and add the holes. It fits loosely into the groove in the outer skin. Its not secured to the outer. The gap between the inner and outer skin is about 6mm. The inner skin provides the well for the meths and holes must be put into the inner just below the top lip to ensure that enough air provides combustion and that any excess fuel has an escape route to ground.

I made my base from a cut open drinks can which i flattened and cut round. I didn’t cut 1 large central hole as the original but added 2 rows of smaller holes. Functionally no different.
The beautifully formed 12-10 on the left and my prototype on the right.

I’m again unsure of how TD joined the outer with the base but it’s flawless and if it was liquid welded or friction welded they made a superb job. 
So thats the next step for me, finding liquid weld that will stand the temperature. I eventually found some in a motor accessory shop. Made in the USA.
It set in 4 minutes and although i didn’t make a neat job of it, it still worked.
Would it work in practice? Well i tried it first off and gave it a whole lot of space just in case it fell apart. It didn’t. It worked well. I boiled about 3 litres of water just to see if it deteriorated and it didn’t. 

So i set about a little boil test and the results were:- 15ml of meths into both stoves. 400 ml of water into the pan.
  • The original 12-10 stove boiled in 4 minutes 55 seconds.
  • My attempt boiled in 4 minutes 58 seconds.
Considering i didn’t measure quantities to the ‘Nth” degree i say my experiment was a success. Although aesthetically not as pleasing, it works well.

But as i said at the start. Spend the £15 and buy one. Or have a go at making one and then let me know how you went on.

Tuesday, August 20, 2013

Watergrove Tops.


Watergrove is a reservoir and small country park situated just North of Rochdale. And surprisingly this was my first visit.

I parked beneath the great dam wall and checked i had everything in the rucksack. I hadn’t. No compass, but i had a GPS with me. But it had the wrong map in it. I had the Lake District map which was obviously no use. All i had then was an os map, which was the right one and the GPS which would give me my grid reference if i needed it that badly.

So off i started with the intention of walking the surrounding tops and not the circular reservoir walk.

Plenty of people were about, including dog walkers, horse riders, United Utilities folk and of course me with a rucksack.

Like i said, i had not been here before so walking at a brisk 3 miles per hour was out, i wanted to investigate the nooks and crannies of this historical area and generally get to know it a bit better and take in the views.

There is quite a history of people and industry in this area dating back to pre-historic times. A Bronze age barrow has been recorded on Hades Hill. Settlements were recorded as far back as the 12th and 13th centuries in the files of Whalley Abbey but the ruins of buildings that can still be seen today date back from the 16th and 17th centuries up until more recent times.

During the 16th century demand for wool and coal was high in this area and new farms were prevalent on the moors. Unfortunately with the building of the reservoir in the early 20th century most of these farms were abandoned and derelict. Some of the farm date stones and mullion windows have been incorporated into the dam wall for posterity and add some character.


I believe the above 3 images that show date stones and other architecure were from the buildings that were flooded on construction of the reservoir.

The tops of the hills contain lots of Bell Pits. Hand dug holes and chambers where coal of pretty poor quality was excavated.

The late 18th century saw the building of 3 water powered mills. Watergrove, Alderbank and Roads which provided work for the locals until the 1920’s.

The reservoir itself was built during the Cotton Famine years of the 1930’s and employed many of the unemployed workers of the cotton industry.

My first “Top” was called “Rough Hill”at 435 metres and so i set off along the top of the dam and along the east side of the reservoir. Lots of trees had been planted along the route with name plates at their base. This was “A life for a life” memorial forest scheme.

I passed a number of ruined areas, Little Town, Steward Barn and Lower Slack Farm.


Ruins of Little Town


Sheep now occupy Lower Slack Farm

The day was quite overcast although humid. There was no breeze but ominous dark clouds swept by and i wondered if i might get the odd shower soon. I kept checking the map to make sure i was on the right path. Numerous paths interlace and i thought it could be easy to go wrong. I was on Ramsden road, a corbelled route not dissimilar to Rooley Moor rd i have posted about in the past. The route splits where the Long Causeway goes NE and a second route heads off in a NW direction for Higher Slack Brook. My track was a muddy one, heading N and skirts the east fringe of Rough Hill.

A mountain biker was heading towards me but not overly fast. The route was boggy in parts and quite slippery. I looked for the falls shown on the map but there was nothing much in the brook. i reached the next split in the path at a confluence of two streams. Both hardly flowing today. I stopped for five minutes to take in the scenery and could make out a large excavator across the fellside. Turbine i thought, but i don’t know if this is true or not.


Taken with full telephoto.


Start of the track around Rough Hill

I stayed on the path for some distance around Rough Hill until i hit a fence line. I was hoping to get a glimpse of Ramsden Clough Reservoir but it didn’t appear from my vantage point unfortunately.

I retraced my steps and headed for the top of Rough Hill. The excavator had chewed up lots of the land on its way across the moor and made deep boggy furrows in numerous places.

I took a few photo’s from Rough Hill and Hedes Hill as the sky was darkening and a stiff breeze was blowing from the west.


Track skirting east of Rough Hill with Freeholds Top (454 metres) in background.


Excavator tracks at top of Rough Hill 434 metres.


Looking at Ramsden Clough reservoir. I think i have just picked up the edge between the pylon on the right and the central one but the reservoir seems empty. This was taken from Hedes Hill. 433 metres.

From Hedes hill i could see the quarry at Whitworth and the scale of it. We used to test our machinery in the quarry here, in prototype stage of development.


Large scale quarrying at Whitworth.

As i packed up the camera a chap approached from the direction i had climbed. It was the first person i had seen since leaving the reservoir circuit. Pleasantries given and away he went towards Middle Hill, my destination too. He seemed in a bit of a hurry, maybe it was the dark sky’s threatening. I stopped to look at the Bell pits and the stone quarrying and thought “What a mess”. I think stone is still being moved from these pits.


The quarried summit of Middle Hill. An Undulating mess at 400 metres.

Dropping down between Middle Hill and my next top, Brown Wardle Hill i sat down on a good piece of grass and had a bite to eat. I watched the chap i had seen earlier, picking his way across the moorland, then backtracking and starting off again. He seemed a little mislaid.

I looked for and found the boundary stone on Middle Hill with it’s “S” on one side and “H” on the other.


I wondered if it stood for Spotland and Huddersfield but i don’t know for sure. Anyone who may have the answer, by all means put me right.

The terrain between Middle Hill and Brown Wardle Hill is also pretty chewed up with quarry type tracks and it didn’t take long to reach the top.


Heading over to Brown Wardle Hill at 400 metres.

I came off BWH to the east and dropped down to the bridleway. I came across the chap from earlier who i thought would have been long gone. He was backtracking again so i asked him if he was ok. He said he was and that the knees were not as young as they used to be. I noticed he had a map with him and the reservoir was in sight and therefore he couldn’t get lost, could he?


Am i heading South? No. Are you sure? Yes. Oh well.

We both headed off South and along the bridleway to the crossing point with Higher Slack Brook. I’m not sure which way he went but as i skirted the west bank of the reservoir he ended up behind me when he should have been far ahead because i stopped lots of times to take photo’s.


Watergrove reservoir

The track back to the car has been provided by United Utilities. The old paths now overgrown and quite difficult to pick out. Although the map shows lots of routes the Utilities one is so prominent that the others will/have disappeared which is a great shame.


Considering this was my first time here, it opens up the moorland North across to Todmorden and i will be back to do more. A very nice walk.


There you go Martin. The map, so that you won’t need a guide.


Saturday, August 17, 2013

MLD Duomid, Pole extender MYOG.

I bought a second hand MLD Duomid recently from Dawn. I knew it would be in good condition coming from her and it came with a solo Oookworks inner too. What it didn’t come with was a walking pole extender which you need to have.
I asked around a few people that have blogged about the Duomid and received a wealth of advise. Thanks everyone, you know who you are.
I decided to make my own but taking into consideration what Colin Ibbertson had wrote about the extending pole in bad weather.   And also the poles which were on offer from MLD and Backpackinglight UK.  (You can read Colin’s post here.)

I don’t use walking poles at all. I tried the idea years ago but we never got on and i ended up carrying them more than using them. So they ended up relegated to the loft.
I knew that i would have to use at least one entire pole and after searching the loft i could only find one. What has happened to the other i am at a loss. I weighed the pole and considering this Komperdell pole is ancient, it weighed 260 grams. Quite good i thought.

So i had a go at making a prototype with a piece of central heating copper tube and then when i had proven the right length, looked around for some aluminium tube to make it lighter. I had nothing suitable at home and the price of tubing at the DIY stores was too high. I had to buy a metre and i only wanted about a third of that. Eventually i came across a complete pole at GoOutdoors and it only cost £3.99. Strip it down and use the materials i thought. How they make this pole and sell it at a large markup is quite something in itself.

The central section of the new pole was a near perfect size to suit the pointed end of my Komperdell. It was quite tight and very little wobble under pressure. But i came up with the idea of how to make it a perfect fit. I wrapped the sharp end of the pole with cling film and then after positioning the extender tube, i filled it with builders expanding foam and let it harden. The inside shape of the extender now matched the shape of the Komperdell perfectly and it should prevent any wobble in bad weather.  I warmed up the small rubber bung that you get supplied with a pole in boiling water and i just managed to fit it over the exposed end of the extender tube so that it will protect the tent material when its located in the apex.

With a bit of pressure i managed to remove the handle from the Komperdell. After all, i will not be using it as a walking pole and therefore it is a bit superfluous. I cut the rubber handle down off the new one and fitted it to the Komperdell. This will give the pole its support on the ground. I can also refit the old handle if i ever need a walking pole.

Complete finished pole and extender weight. 280grams. Cost of extender £3.99. Time to make around 30 minutes plus overnight curing time for the foam. (It does dry quicker but i left it overnight.)

The walking pole extender at 27cm long complete with strengthening ferrule and protective bung.

The adjustable walking pole and extender assembled.

The reworked handle


Find it Here

About Me

My other blog. beneathwhosefeet.wordpress.com